Apparatus:
Two mounted capacitors marked A & B, coulombmeter, digital voltmeter set on 20V DC, lab power supply set on 10V DC, rheostat, wires.
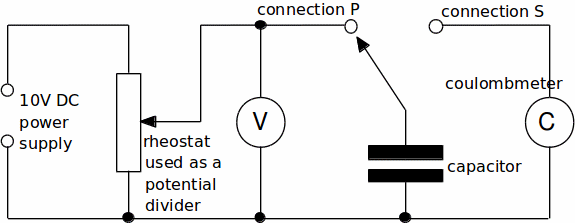
Circuit diagram:

Procedure :
1. Set up the circuit shown above with one of the capacitors. The wire from the top of the capacitor should be initially connected to "connection P".
2. Adjust the potential divider to give a voltage of about![]() The capacitor will now be charged to this voltage. Record the actual voltage reading,
The capacitor will now be charged to this voltage. Record the actual voltage reading,![]()
3. Press the red button on the coulombmeter so that it reads zero nanocoulombs.
4. Transfer the wire from "connection P" to "connection S". The charge that was on the capacitor will now be transferred to, and measured by, the coulombmeter. Record the charge reading,![]()
5. Repeat stages 2 to 4 for a range of voltages between 0 and![]()
6. Repeat stages 2 to 5 for the other capacitor.
7. Using a common set of axes plot graphs of charge![]() against potential difference
against potential difference![]() for both capacitors.
for both capacitors.
8. Use these graphs to answer the following:
(a) What do the graphs show about how the charge of a capacitor relates to its potential difference?
(b) Calculate the capacitance of each capacitor. (Remember that![]() )
)
[Note: Capacitor A should be about 22nF; B about 47nF]
9. When two capacitors are connected together in parallel the total capacitance![]() is given by
is given by
![]() Use your circuit to check how well this relationship works with your capacitors.
Use your circuit to check how well this relationship works with your capacitors.
